FlashCards How To
This section aims to help you get the most out of FlashCards. Please contact me if something is unclear, or you would like a specific video for how to do something.
How do I add HTML to my cards?
NEW: You can activate the HTML Editor when creating or editing your cards. Embed HTML into your cards just like you were working in any ole Word Processor, no HTML Knowledge Required!
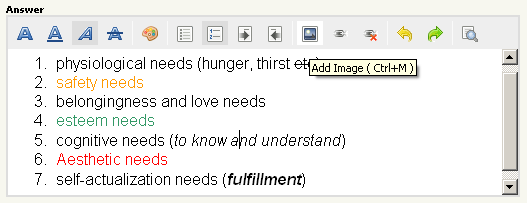
Keep in mind, if you use HTML, the text auto grow feature will NOT work. It will assume you have made font-size changes and will not auto-resize any text. This is done because it can interfere with your HTML code. I kept the HTML Editor simple, for simplicity's sake. You can use more complicated HTML if needed, but you are on your own for implementing it.
How do I add Images to my cards?
FlashCards does support images, so how can you use them? Using Quizlet Plus, it's a breeze! It's also easy with the HTML Editor.
IMPORTANT: First, you need your images. Please save them in JPG, PNG, or GIF format only.
DIMENSIONS: Images must be no larger than 270x250 pixels in height/width. Larger images will not fit within the card on device.
NOTE: An active data connection is required to view images.
1.) Use Quizlet PLUS
Quizlet has just launched Quizlet PLUS. It is a $10/year charge, but allows you to upload your own images and use them in your flash cards. Why am I recommending this paid service? Simple: It's inexpensive, and it works really good. Why is there a charge? It takes real server space and bandwidth to store and deliver those images. The fee works out to less than 3¢ per day, and is well worth it. Read more about Quizlet Plus.
2.) Use Other Sources & the HTML Editor
- Ok, so you have your images. First thing you need is to put them online. You can use your own webserver, or a free service such as:
- ImageShack: http://imageshack.us
- PhotoBucket: http://photobucket.com ***
- TinyPic: http://tinypic.com
- You now need the URL to this image. For example:
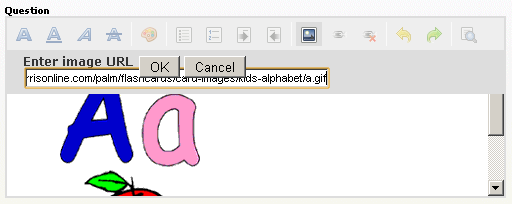
http://www.jeharrisonline.com/palm/flashcards/card-images/kids-alphabet/a.gif
You will notice, if you paste this into your browser, the image itself will show. Using the online services, they will provide the URL to your image to you. Copy this URL.
If you use imageShack, your URL will look like: http://img16.imageshack.us/i/19093205.png/
- Now we need to add it to the card. Make sure the HTML Editor is activated. Click on the "Image" icon (10th from the left). It will promt you for the URL to the image. Paste in the URL you copied from the upload method used above and click Ok.
- That's it. The HTML Editor will take care of the HTML code required for this. Save the card and repeat as needed.
*** It is best to start an account with PhotoBucket first. This is free. If you upload the images and then put them into an album, the URL will change and break the cards. It is best to create an album FIRST, then upload images into them.
How do I add AUDIO to my cards?
Record It
The easiest way to get audio is to record it through the Online Tools! It's free and takes moments to get up and running.
Read more about recording online.
Manually Add It
Just like the images, the Audio works very similar.
IMPORTANT: Audio files MUST be in MP3, WAV, or any format supported by webOS.
- You must upload the audio file to a webserver, or file sharing service
- You will need to know the exact URL to the media file itself.
Example: http://www.jeharrisonline.com/palm/flashcards/card-images/kids-alphabet/a.mp3 - Once you have the URL to your audio file, you can build the tag to go into your card:
<audio src="http://www.jeharrisonline.com/palm/flashcards/card-images/kids-alphabet/a.mp3">
NOTE: This is NOT a standard HTML Tag. This is specific to FlashCards. The application will read this special tag and process the URL to the audio file, then play it using your device. - That's it. Place this code in in your Question, Answer, or Third Card. Sorry, audio is not supported in the hints or multiple choice questions at this time.
Check out the Sample Import File to see how you can add audio using this method.
Audio recording through the Online Tools is currently in Beta and will be released shortly.
How do I record audio for my cards?
When editing a card, you should now see some special options. For the Question and Answer, you can click the microphone to record your audio. When clicking this option, a box will display with the controls.
First Time: The first time you run this tool, you will get a security prompt asking for permission to run. You must accept this agreement as it allows access to the micophone on your computer.
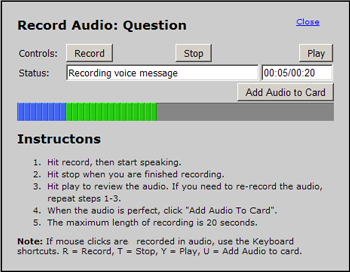
To Record:
- Click on the microphone icon.
- Click on the "Record" button and begin speaking. Also use keyboard shortcut "R".
- Click "Stop" when you are finished speaking. Also use keyboard shortcut "T".
- You can listen to the audio by hitting play. Also use keyboard shortcut "Y".
- When you are ready to assign the audio, click "Add to Card". Also use keyboard shortcut "U".
- The option to now preview the audio will be displayed. Save the card data and the final steps will be taken.
That's it. The process is extremely easy to use. Now download your Flash Card Set to your device and study. Audio will automatically play for cards that have it (and it's proper side).
How do I import from CSV/TAB/TXT Files?
FlashCards supports importing your data from CSV, Tab, and TXT data files. Download the Sample CSV File for the format you MUST use in order to import from file. The Question & Answer are required, the rest are optional unless you want data in those fields.
Just follow these steps to import from a file:
- Login to the FlashCards Online Tools
- Create a new set. Give it a name, public or private, category, and description.
- Click Save
- Click on the "Import from File" tab.
- Select the file using the "Browse" or "Choose File" button.
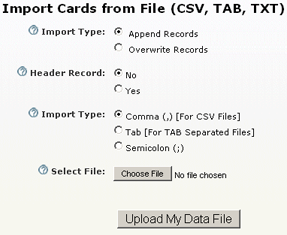
- Review the other settings.
- If you are adding data to the set, choose "Append Records". If you would like this data to REPLACE what currently exists, select "Overwrite Records".
- If the first line in your file has the "header" records, choose Yes for Header Record (default).
- By default, CSV data is accepted. You can change the delimiter to TAB or a Smeicolo (;)
- Click the "Upload My Data File" button
- You will be asked to review the first 50 records of data. Make sure the columns match up with the header data. It must be in the correct order for the import to work properly. If the fields are not aligned properly, you will get data in the wrong fields.
- Click the confirmation button.
- You can now download the data to your device by tapping "Download" from the opening screen, then "My Sets".
** Download the Sample CSV File
** If you are importing data for non western languages, you will need to save the file in UTF-8 format. By default, English versions of Excel save it in Latin-1 which will not hold special characters for French, German, Chinese, etc.
How do I import from Quizlet.com?
FlashCards now supports direct Quizlet.com searching and installation inside of the application. This guide is old and used only if you want to manually pull from Quizlet.com into your Online Tools Account.
Quizlet.com is just one of the many great resources for Flash Cards. Importing from Quizlet.com is easy.

Just follow these steps to import from Quizlet
- Go to www.quizlet.com
- Search for the flash card set you would like and click on it to see the details.
- Click on the "Export" link/button
- For the data, click on "Select All"
- Right click in the data box, and choose "Copy" (or <ctrl> + C)
- Login to the FlashCards Online Tools
- Create a new set. Give it a name, public or private, category, and description.
- Click Save
- Click on the "Import from Other" tab, then select "Quizlet" from the options.
- Paste the data into the "Flash Card Data" box. You can right click in the box, and choose "Paste"
- Click the "Import Flash Card Data" button
That's it. Your Flash Cards have now been imported. You can now download the data to your device by tapping "Download" from the opening screen, then "My Sets".
How do I import from Flash Card Exchange?
Flash Card Exchange is another great source for ready made Flash Cards.
IMPORTANT: In order to export from Flash Card Exchange, you MUST have a membership. This is a lifetime subscription for only $19.95. We do not control this, but is a requirement from Flash Card Exchange. We believe it is worth the investment.
Just follow these steps to import from Flash Card Exchange
- Go to www.flashcardexchange.com
- Search for the flash card set you would like and click on it to see the details.
- Click on the "Export" link/button
- If you are not already logged in, you will have to do so now or purchase a lifetime account.
- In the first option, Comma Separated Values, uncheck the box for "Include Side 3".
- Click the "Create CSV file" button.
- This will save a CSV file to your computer. Make sure you rename it, or remember the name as well as where it is stored on your computer. You will need this name and location.
- Click on the "Export" link/button
- Login to the FlashCards Online Tools
- Create a new set. Give it a name, public or private, category, and description.
- Click Save
- Click on the "Import from File" tab
- In the File section, click the "Choose File" button. Now find the file from your computer and select it. Hit the Ok button.
- Click the "Upload My Data File" button.
- Review the content presented here for accuracy. The first 50 rows of data will be shown. Only the question and answer should have data in the columns.
- When reviewed, click "Confirmed - Import Records"
- Click the "Import Flash Card Data" button
That's it. Your Flash Cards have now been imported. You can now download the data to your device by tapping "Download" from the opening screen, then "My Sets".
If you absolutely do not want to pay for a FlashCardExchange account and only need 1 or 2 sets imported, email me the links along with your email address for the Online Tools.
How do I import from StudyStack.com?
StudyStack is one of the finer resources for FlashCards with the most options (besides FlashCards for webOS of course).
Just follow these steps to import from StudyStack
- Go to www.StudyStack.com
- Search for the flash card set you would like and click on it to see the details.
- Click on the "Export" link/button (has a remote looking icon)
- Choose the option for "FlashCards for webOS" (yes, this is custom for us!)
- Click the "Export to FlashCards for WebOS" button.
- This will save a CSV file to your computer. Make sure you rename it, or remember the name as well as where it is stored on your computer. You will need this name and location.
- Login to the FlashCards Online Tools
- Create a new set. Give it a name, public or private, category, and description.
- Click Save
- Click on the "Import Other" tab, then select the StudyStack.com section.
- Click on the "Browse" (or 'select file') button to find the file from your computer and select it.
- Click the "Import Flash Card Data" button.
That's it. Your Flash Cards have now been imported. You can now download the data to your device by tapping "Download" from the opening screen, then "My Sets".
It will actually use the CSV import method, so you can use that route as needed as well.
How do I import from ProProfs?
Pro Profs Flashcards is yet another great source for ready made Flash Cards.
Just follow these steps to import from ProProfs
- Go to www.proprofs.com/flashcards
- Search for the flash card set you would like and click on it to see the details.
Copy the URL in the title bar of your browser.
- It should look like: http://www.proprofs.com/flashcards/story.php?title=german-vocabulary_32
- Login to the FlashCards Online Tools
- Create a new set. Give it a name, public or private, category, and description.
- Click Save
- Click on the "Import Other" tab, then select the ProProfs section.
- Paste the URL into the "URL" box. You can right click in the box, and choose "Paste"
- Click the "Import Flash Card Data" button
That's it. Your Flash Cards have now been imported. You can now download the data to your device by tapping "Download" from the opening screen, then "My Sets".
NOTE: This method is required since the "Download" feature on ProProfs does not take into account HTML Cards nor proper Line Break support. You can still use their download and paste the data into the Quizlet Import to utilize the old method, but it may not capture all of the data.
How do I import from FlashCardDB.com?
FlashCardDb.com is yet another great source for ready made Flash Cards.
Just follow these steps to import from FlashCardDB.com
- Go to http://www.flashcarddb.com
- Search for the flash card set you would like from the top left, or browse through their categories.
- Click on the "Export" link/button below the set name, in the same line as "Bookmark & Share"
- The first option is labeled "Separate questions and answers by:", change this to TAB
- Now click the "Select All" link above the text box. This will auto all of the flashcard data for you.
- Right click in the data box, and choose "Copy" (or <ctrl> + C)
- Login to the FlashCards Online Tools
- Create a new set. Give it a name, public or private, category, and description.
- Click Save
- Click on the "Import Other" tab, then select FlashCardDB.com
- Paste the data into the "Flash Card Data" box. You can right click in the box, and choose "Paste"
- Click the "Import Flash Card Data" button
That's it. Your Flash Cards have now been imported. You can now download the data to your device by tapping "Download" from the opening screen, then "My Sets".
How do I import from Excel?
Importing your data from an Excel file you have created is easy as Copy and Paste.
Just follow these steps to import from Excel
- Open your Excel file
- Select the data (columns and rows) you want to import, and copy them.
- Login to the FlashCards Online Tools
- Create a new set. Give it a name, public or private, category, and description.
- Click Save
- Click on the "Import from Other" tab, then select "Import from Excel (Copy/Paste)" from the options.
- Paste the data into the "Flash Card Data" box. You can right click in the box, and choose "Paste"
- Click the "Import Flash Card Data" button
That's it. Your Flash Cards have now been imported. You can now download the data to your device by tapping "Download" from the opening screen, then "My Sets".
NOTE FOR NON-ENGLISH LANGUAGES: If you are importing a set that uses a non-English character set, you may have to change the Encoding located in the Misc Tab for this set. This is due to the way that Excel handles the data. If you download the set and you see boxes in place of charcters, change this option.
Download the Sample Excel File
How do I download Flash Cards to my device?

So you have your Flash Cards created using the Online Tools, now what? You need to install them on your device. Follow this guide:
![]()
- When you load up FlashCards on your device, there are three buttons in the center. Tap on "Download"
- You will see options to browse several different sources for FlashCards.
- The sets you have created using the Online Tools will now be shown. You can filter them by typing on the keyboard to quickly find what you need.
- Tap on the set you want to install. You can then review it and install it as needed.
- Note for Lite Version: FlashCards Lite users will have to delete any sets currently installed before installing new ones. The Lite version is limited to 1 set of Flash Cards at a time.


